When the lights go out, a 10kW generator can be your household's lifeline, keeping essentials humming and comfort high. But unlike plugging in a lamp, the Installation & Electrical Hookup for 10kW Generators is a serious undertaking, demanding precision, adherence to safety standards, and a thorough understanding of your home's electrical system. This isn't just about restoring power; it's about doing so safely, reliably, and in full compliance with local codes.
Think of your generator installation as building a mini power plant for your home. Every connection, every placement decision, and every safety check contributes to a system that will perform flawlessly when you need it most. Neglecting any detail can lead to serious hazards, from carbon monoxide poisoning to electrical fires. So, let's roll up our sleeves and explore how to properly integrate this vital appliance into your life.
At a Glance: Key Takeaways for Your 10kW Generator Installation
- Safety First, Always: Prioritize local codes (ICC IFGC, NFPA 37, NFPA 54, NFPA 211) and manufacturer guidelines to prevent CO poisoning, fire, and electrical shock.
- Strategic Siting is Crucial: Generators must be placed safely away from openings, combustible materials, and vegetation, ensuring unobstructed airflow.
- Fuel Supply Verification: Confirm your natural gas meter or LP tank capacity meets the generator's demands and other household appliances.
- Proper Electrical Integration: An Automatic Transfer Switch (ATS) is key for seamless, safe power transfer. Ensure correct wiring, battery setup, and grounding.
- Don't Rush Startup: Follow the activation and testing procedures carefully to verify proper operation before relying on the system.
- Professional Help is Recommended: For complex steps or if you're unsure, consult a Generac Authorized Service Dealer (IASD) or a licensed electrician/plumber.
More Than Just Power: Understanding the Importance of Proper Installation
A 10kW generator isn't a small appliance; it's a powerful machine capable of providing significant electrical output. This power, if improperly managed, can be dangerous. The comprehensive guidelines for Generac Power Systems 10 kW to 26 kW, 60 Hz air-cooled generators underscore this importance, emphasizing that these units are not intended for critical life support applications due to their nature.
From the moment your generator arrives, you're embarking on a journey that requires careful attention to detail. Before even thinking about connecting wires or fuel lines, make it a habit to record your unit's Model and Serial number, found on the data label inside the partition to the left of the control panel. These details are essential for any future customer service interactions.
The primary goal of any generator installation is safety and compliance. This isn't a suggestion; it's a mandate. All installations must comply with applicable codes, standards, laws, and regulations, including specific guidelines from organizations like ICC IFGC, NFPA 37, NFPA 54, and NFPA 211. Failing to do so isn't just a legal risk; it's a direct threat to life and property. You can learn more about general safety by reviewing our comprehensive generator safety guide.
Unboxing Your Powerhouse: Initial Steps & What to Expect
When your generator is delivered, the first order of business is a thorough inspection for any shipping damage. If you spot anything amiss, document it immediately. Remember, the front and intake side panels are designed for removal at the installation site, so resist the urge to take them off prematurely.
Opening the intake side panel (A) grants you access to several key components: the battery compartment, customer fuel regulator, sediment trap connections, and a collection of loose parts. These loose parts are crucial and include:
- Keys for the enclosure
- A flexible fuel line
- A battery terminal cap
- The 2-pole main line circuit breaker (MLCB), which acts as your generator's disconnect.
A Critical Warning: Your generator also features an auxiliary shutdown switch. This is strictly for emergencies, not for routine power downs. Using it for normal operation can lead to equipment damage, so save it for when it's absolutely necessary.
The Foundation of Functionality: Site Selection & Preparation
Choosing the right spot for your generator is arguably the most critical step, largely due to the inherent risks associated with running internal combustion engines. Carbon monoxide (CO) asphyxiation is a silent killer, and ensuring proper distance and sealing from living spaces is paramount.
Here's what to consider for effective site selection:
- Carbon Monoxide Prevention: The engine's exhaust contains lethal carbon monoxide. Your primary defense is distance. Install the generator where exhaust fumes cannot enter the structure through windows, doors, vents, or other openings. It's not enough to simply place it outside; you must also seal and caulk the structure itself to prevent CO entry.
- Combustible Clearance: Generators, particularly their engine, alternator, and exhaust components, get very hot. They must be installed at a safe distance from combustible materials like walls, fences, and vegetation. Adhere strictly to the clearance requirements outlined in ICC IFGC, NFPA 37, and NFPA 54.
- Airflow is Everything: The generator needs unobstructed cooling airflow for proper operation and to prevent overheating, which can lead to fire hazards. Ensure vegetation won't grow to block vents and that exhaust fumes won't damage nearby plants.
- Structural Integrity: If you're considering placing the generator on a roof, platform, or any other supporting structure, you must comply with NFPA 37, Section 4.1.3, which outlines specific structural requirements to ensure the platform can safely bear the unit's weight and vibration.
- Connectivity Check: If you plan to utilize the generator's Wi-Fi feature for remote monitoring, verify that the chosen site is within range of your home's Wi-Fi network. This small check now can save you headaches later.
Placing Your Generator: Secure & Level
Generac generators often come equipped with an integrated composite pad, designed to elevate the unit slightly and provide a stable base. This pad is a convenient feature, but depending on local codes or specific environmental conditions, you may need to anchor the generator to a concrete slab.
Your unit will have three mounting holes for this purpose (two in front, one in back). If anchoring is required, 10 [3/8] DIA. masonry anchor bolts are recommended. Before final placement, don't forget to install the four base plugs, supplied with your loose parts, into the four holes located at the corners of the generator base. This prevents debris and pests from entering the base.
For more details on typical installation layouts, you can refer to installation drawings (like A0002360608 rev A), which show mounting to concrete pads, air intake/outlet, minimum open areas, and critical lifting hole locations (a crucial note: "DO NOT LIFT BY ROOF").
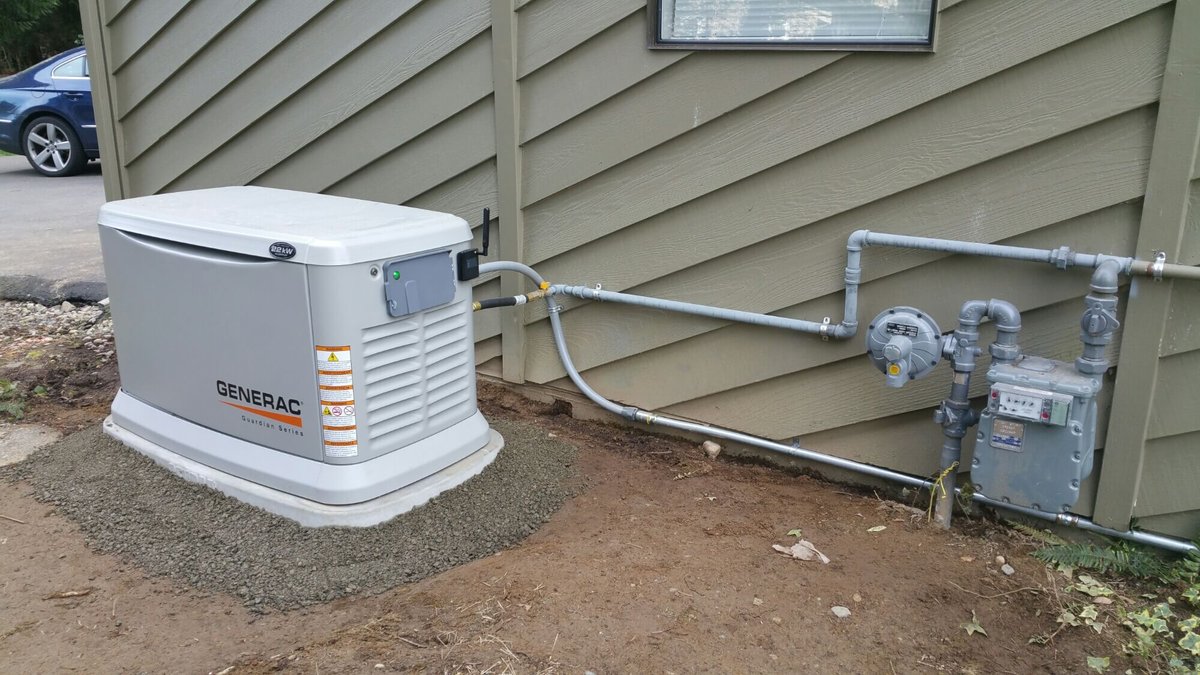
Fueling Your Powerhouse: Natural Gas or Propane Connections
Generators need fuel, and for permanent installations, that typically means natural gas (NG) or liquid propane (LP). Both are extremely flammable and explosive, demanding meticulous attention to connections and leak prevention.
Choosing Your Fuel: Natural Gas vs. LP
Your 10kW unit will have an orange fuel conversion knob. On 10 kW units, this knob is located beneath the fuel mixer; on larger 14 kW–26 kW units, it's above the fuel mixer. It's vital to ensure the generator is configured for the fuel type you'll be using.
Understanding Fuel Consumption:
To adequately size your fuel supply, you'll need to know your generator's consumption rates.
| Generator Size | Fuel Type | 1/2 Load (approximate) | Full Load (approximate) |
|---|---|---|---|
| 10 kW | Natural Gas | 101 ft³/h | 127 ft³/h |
| Propane | 36 ft³/h | 54 ft³/h | |
| 14 kW | Natural Gas | 195 ft³/h | 256 ft³/h |
| Propane | 65 ft³/h | 65 ft³/h | |
| (Note: The LP full load consumption for 14 kW is listed identically at 65 ft³/h for both 1/2 and Full Load in the provided context, which may be a typo in the source material but is reproduced here as given.) | |||
| Fuel Supply Capacity: Before installation, verify the capacity of your natural gas meter or LP tank. It must be sufficient to supply both the generator and all other household appliances that use the same fuel, as per NFPA 211 guidelines. This is a common oversight that can lead to generators shutting down or other appliances not working correctly during an outage. |
Gas Pipe Sizing: Getting it Right
Proper pipe sizing is critical to ensure adequate fuel pressure and flow to the generator. Undersized piping can starve the generator of fuel, leading to performance issues or failure to start. Here are some examples for natural gas pipe sizing (at 0.87-1.24 kPa):
- 10 kW: A 0.75-inch pipe can handle up to 60 feet. For longer runs (up to 200 feet), a 1-inch pipe is required.
- 14/18 kW: A 0.75-inch pipe for up to 55 feet. For runs up to 200 feet, a 1-inch pipe is needed.
These are examples, and your specific installation may vary based on actual pressure, pipe material, and the number of fittings. Always consult a licensed plumber or gas technician to ensure correct sizing and installation according to local codes.
Crucial Fuel Safety Protocols
- No Leakage Allowed: Fuel and vapors are incredibly dangerous. Any leakage is absolutely unacceptable.
- Manual Shutoff Valve: A manual fuel shutoff valve is a non-negotiable safety feature. It must be located within 6 feet (1.83 meters) of the generator's fuel inlet. This allows for quick isolation in an emergency or during maintenance.
- Leak Testing: Perform a fuel system leak test during scheduled maintenance and whenever fuel lines are disturbed. This typically involves closing the main fuel supply valve and checking the fuel pressure at the regulator to ensure it holds steady.
The Electrical Backbone: Wiring Your 10kW Generator
This is where your generator connects to your home's electrical system, usually through an Automatic Transfer Switch (ATS). The electrical wiring enclosure is typically located behind an access panel on the intake end of the generator. After removing the intake side panel, you'll find another access panel to remove to reveal the connection points.
Connecting the wires correctly according to the provided diagrams and tables is crucial. Key control wiring connection points often include:
- UTILITY SENSE: Detects the presence of utility power.
- GROUND: For proper grounding.
- +12 VDC: Provides DC power for control functions and battery charging.
- VAC LOAD: Senses generator output voltage.
- SUPPLY: Connection for the main power feed from the generator.
- TRANSFER: Wiring related to the transfer switch operation.
Grounding and Bonding
Proper grounding and bonding are vital for electrical safety. You'll need to connect a suitably sized system bonding jumper (referencing NEC Table 250.102(C)(1)) from the neutral bar to the ground stud within the generator's electrical panel. Always verify these connections with national and local electrical codes. If you're not an expert, this is a prime area to consult with a licensed electrician or an IASD. Understanding diving deeper into automatic transfer switches is crucial here.
Battery Requirements: The Generator's Spark
Your generator needs a reliable 12-volt battery to start. Generac recommends specific battery types:
- Group 26R Wet Cell with a minimum of 540 Cold Cranking Amps (CCA).
- Group 35 AGM (Absorbed Glass Mat) with a minimum of 650 CCA.
A recommended part number is 0H3421S. It's important not to use external battery chargers on the generator's battery while it's connected to the system, as the generator has its own internal charging system. Be mindful that batteries emit explosive gases while charging, so ensure good ventilation during installation and maintenance. For a broader understanding of your home's power, you might find understanding your home's electrical panel helpful.
Bringing Your System to Life: Startup, Testing & Troubleshooting
With the physical installation and electrical hookups complete, it's time to activate and test your generator. This isn't a "flip a switch and go" moment; it's a methodical process to ensure everything works as intended.
Control Panel Activation & Initial Setup
The control panel interface is usually located under the generator enclosure lid. Activation is typically a simple, one-time process. The display will guide you through language selection and whether to enable or disable Wi-Fi connectivity.
An important feature to note is the Cold Smart Start. This feature only becomes active in AUTO mode after the initial setup is complete. During startup, the controller also performs an Interconnect System Self Test—a crucial diagnostic to prevent damage from incorrect AC utility power sense wire connections.
Checking Manual Transfer Switch Operation
This test verifies that the generator can produce the correct voltage and frequency:
- Connect a calibrated AC voltmeter and frequency meter across the transfer switch terminals E1 and E2.
- Start the generator in manual mode.
- The voltage should read between 238��242V, and the frequency should be between 59.5–60.5 Hz.
- If the voltage is incorrect, ensure the generator MLCB (main line circuit breaker / generator disconnect) is in the ON (CLOSED) position.
Checking Automatic Operation
This confirms your generator will kick in when utility power fails:
- Record the running fuel pressure for future reference.
- Ensure the generator MLCB is in the OFF (OPEN) position for this initial test setup.
- Set the generator to AUTO mode.
- Now, turn off the utility power supply to the transfer switch. The generator should sense the power loss, start, and go through its warm-up cycle.
- After the warm-up, the transfer switch should engage, transferring load to the generator.
- Once you've verified operation, restore utility power. The generator should sense the utility return, transfer the load back, and then cool down before shutting off.
Common Troubleshooting Tips
Even with perfect installation, minor issues can arise. Here are quick solutions for common problems:
- Blown Fuse: If the control panel isn't responding, check for a blown 7.5A fuse in the control panel. Replacing it often resolves the issue.
- Engine Will Not Crank: Inspect battery cables for looseness, corrosion, or damage. A faulty battery can also be the culprit.
- Unit Set to OFF, But Engine Runs: This indicates a serious control issue, likely incorrect wiring to the controller or a faulty control board. Immediately contact an Authorized Service Dealer (IASD).
- No AC Output: First, verify the generator MLCB is ON (CLOSED). If it's open, the generator can run but won't send power to your home. If the MLCB is ON and there's still no output, it points to an internal generator failure, requiring professional service.
For persistent issues, especially those related to the control board, always contact an IASD. They have the specialized tools and knowledge to diagnose and repair complex problems.
Quick Reference: System Diagnosis & Alarms
Your generator's control panel provides diagnostic messages. Here's a quick guide:
- Clearing Alarms: To clear an active alarm, press ENTER twice, then AUTO. If the alarm recurs, contact an IASD.
- FLASHING NONE AUTO but no output: Check if the unit is running in generator mode. If it is, ensure the generator MLCB is ON.
- OVERCRANK (Unit will not start in AUTO with utility loss): First, verify the fuel line shutoff valve is ON. Clear the alarm and then try starting the unit in MANUAL mode. If the issue persists, contact an IASD.
- CHARGER YELLOW illuminated: This indicates a charging system issue. Contact an IASD.
- SERVICE A YELLOW illuminated: This is a maintenance reminder. Perform the recommended SERVICE A maintenance (e.g., oil change, filter check).
- You can always Explore our 10000 generator guide for broader context on these powerful machines.
Enhancing Your System: Accessories & Optimization
Once your 10kW generator is installed and fully operational, you might consider accessories to optimize its performance or protect it in specific conditions.
Cold Weather Accessories
If you live in a region where temperatures frequently drop below 0 °F (-18 °C), a Battery Pad Warmer is highly recommended. This ensures your battery retains enough cranking power in frigid conditions. Note that AGM-style batteries generally perform better in cold weather and may not require a pad warmer.
Smart Management Modules (SMM's)
Generac's Smart Management Modules (SMM’s), available in 50 and 100 amp ratings, are game-changers for optimizing your generator's performance. These modules intelligently manage large electrical loads in your home (like air conditioners, electric water heaters, or pool pumps). During an overload situation, SMMs can shed these non-essential loads, allowing your generator to continue powering critical appliances without being overwhelmed. This intelligent load management can potentially reduce the overall size and cost of your standby generator system, as a smaller generator can handle a larger perceived load by prioritizing.
Beyond Installation: Ongoing Care & When to Call for Help
Proper installation is the first major hurdle, but maintaining your 10kW generator is an ongoing commitment. Regular maintenance, as outlined in your owner's manual and suggested by the control panel's "SERVICE A YELLOW" indicator, will ensure longevity and reliable operation. This includes checking oil levels, replacing filters, and general inspections. A comprehensive overview can be found in essential generator maintenance tips.
While many troubleshooting steps can be handled by an attentive homeowner, there are times when professional intervention is essential. For internal generator failures, persistent control board issues, or any situation where you are unsure of the cause or solution, contact an Authorized Service Dealer (IASD). Attempting complex electrical or mechanical repairs without proper training and tools can be dangerous and void your warranty.
Ultimately, your 10kW generator is a significant investment in your home's resilience. By meticulously following installation guidelines, understanding its operation, and committing to ongoing maintenance, you'll ensure it stands ready to protect your comfort and safety whenever the grid falters.